Column Reinforcement tool for ALLPLAN users
ALLTO has released tools that automate the modeling of reinforcement for column in ALLPLAN.
ALLPLAN PythonParts for Column Reinforcement makes it efficient to model main rebar, stirrups, side bar, calculate overlap and create sections… a task that structural engineers and structural engineers have to spend a lot of time on if they’re stuck doing it manually.
Here's the basic workflow for using Column Reinforcement.
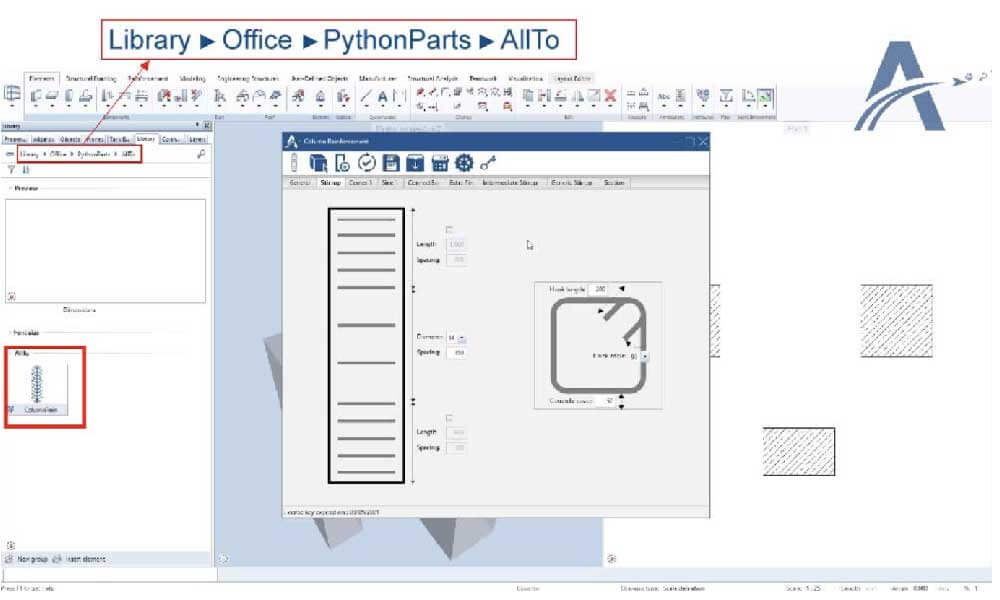
1. ALLTO Library
Open ALLTO window of Column reinforcement and create new configuration.

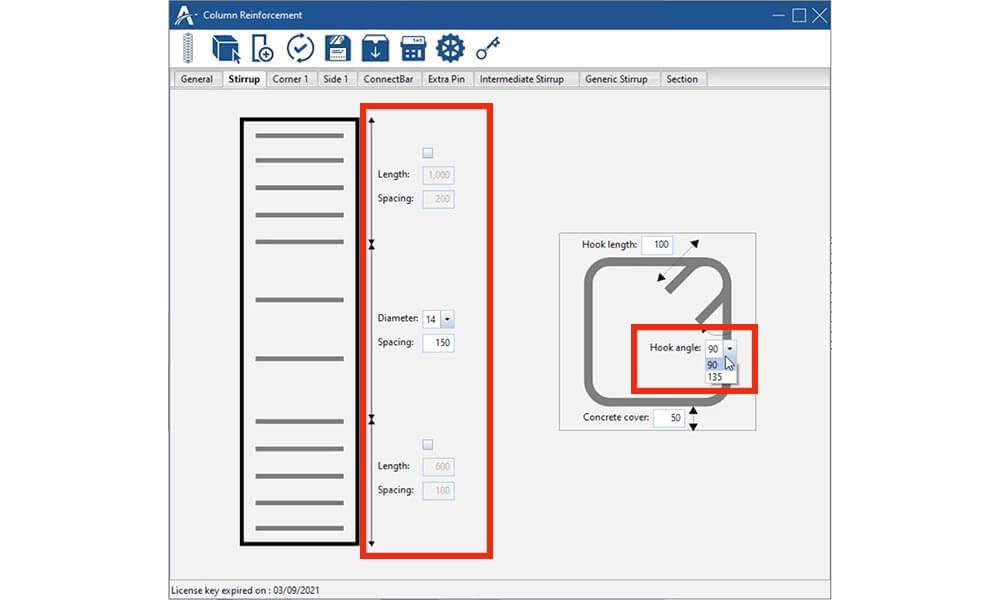
2. Stirrup Rebar
In ‘Stirrup’ tab, you can define hook length, hook angle and concrete cover. Enter cover settings for column, main reinforcement, and stirrup layout. Hook angle has 2 options 90 and 135. Stirrup can be defined in 3 different spacings.

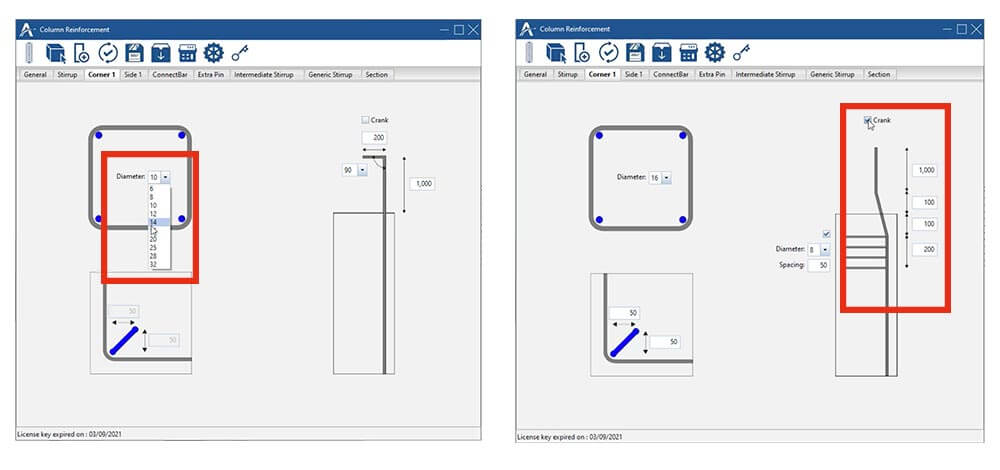
3. Coner Rebar
Corner rebar can be a straight or crank rebar. We can define it in corner rebar tab.
- All lengths can be customized.
- Extra stirrup can also be included.
- Crank distance for both sides is possible to be defined.

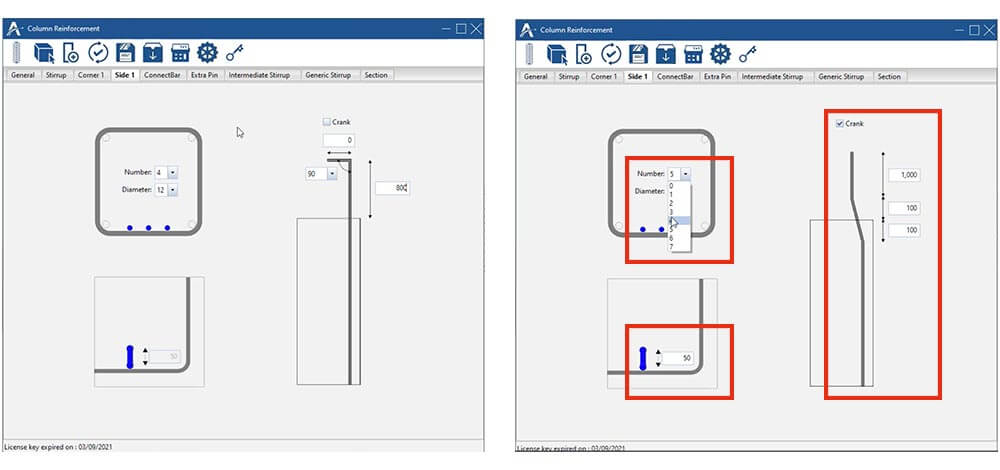
4. Side Rebar
Side rebar can be defined similarly to corner rebar in side rebar tab. You can set hook length to 0 to create straight rebar without hook.

5. Creating column rebar
Reinforcement can be created for any object or only for column object by clicking the icon  . Select one by one to create reinforcement. You could also select in plan view in ALLPLAN software.

Modify, rearrange marks and create legend for these objects have been created by allplan pythonparts such as bar schedule – bending shapes. It’s like you do manually with ALLPLAN.

6. Defining different rebar
In some cases, you need to define differently for corner and side rebar. To do that, you go to general tab –> turn off ‘same as’, the ‘corner 2’ tab will appear and you can define the corner 2 rebar differently.

The same way for side bar. To do that, you go to general tab –> turn off ‘same as’, the ‘side 2’ tab will appear and you can define the corner 2 rebar differently.

7. Get Geometry
Assure that you have 2 columns, column above is smaller than column below, you can use feature ‘Get Geometry’ to define quickly corner rebars and side rebars.
- Go to setting –> column above. In in tab, you can define setting for column above or make it the same with column below by click choose ‘same as below’. Defining whether the corner rebar will crank and avoid above rebar.

- Defining diameter for corner and side rebar, turn off same as if necessary.

- Click on button ‘Get Geometry’ –> choose column below and column above.

8. Extra pin
In ‘Extra Pin’ tab, you can define pin setting such as hook length, diameter. Spacing can be adapted to stirrup spacing or define independently.

Click to the side rebar at the bottom and right to define extra pin. Click again if you want to remove the point you’ve chosen.

9. Intermediate stirrup
Intermediate stirrup can be defined similarly by clicking start and end bar. Stirrups could also be seperately cleared.


10. Generic stirrup
Same way above can be applied for Generic stirrup. Selecting directly on the right side to define generic stirrup (you can click to any point on the right side). Undo to remove last edge and clear to remove stirrup.


11. Calculating Overlap
Calculator support you to calculate starter length base on your company standard.

You can also manage the calculation in ‘setting’. Select database to calculate overlap length.

Or you can create your own overlap dababase –> save as your own database with specific name.
Create your own overlap dababase by clicking the icon ![]()

Named your own overlap database so that you can choose later.

Your database custom has been saved.

Choose your custom database standard to calculate overlap.

12. Save and Load Favorite
You can save your all input as a favourite file (.json). Then you will see a pop up box said ‘save data sucessfully’.

Load favorite file can help you quickly define all input for column.

13. Section and cross section
Section also supported in ALLTO column python part.
Included elevation and define its location.

- Click ‘title’ to define title: Name title for the section.
- Define the title with parameter buttons in the right side.

You also set font for the title.
NOTE: the front size is 10 times bigger than ALLPLAN text height.
- For example: you want the title text height is 5 mms, you’ll set the font size 50. Title can also be bold, italic, or underline.

Then, click save to finish and section is created.

Cross Section
- Easily create cross section by clicking on ‘Cross section’ feature.
- Defining the distance to the main section.
- Also spacing fom dimension and title.
- Define the label for stirrup and fomat the labeling
- Click to the column, then click on 1 point in plan view to create column reinforment with section created.

14. Create as reinforcement or PythonPart element
You can create reinforcements as nomal rebars or PythonPart element with position name.

Click ![]() to create one python part element, also contain reinforcement. You can double click to python part element to modify it. You are freely copy, paste/move/rotate the python part element.
to create one python part element, also contain reinforcement. You can double click to python part element to modify it. You are freely copy, paste/move/rotate the python part element.

14. Edit and Automate updating by double click or by defined name
- Click any PythonPart element and modify it. Then, click to update and re-confirm the message you want to update. All the PythonPart elements with same shape and position name will be updated.


- Open the dialog to creating new element and modify it. Click update button and input an position name. All the PythonPart elements with same shape and position name will be highlighted. Re-confirm the message to update all position name was found.


Column Reinforcement is a feature of our PythonParts for ALLPLAN, which covers modeling and documentation of elements and reinforcement of walls, beams, and now columns.
Take a free 7-day trial of Column Reinforcement.
- Email us at trial@alltosoftware.com to get the installation file that matches your Allplan version.
- Open ALLPLAN.
- In the ALLTO library, select Column Reinforcement.
- Activation code will be sent to you via email.
- Enter the activation code.
- Trial away!

